
In the previous part, we have created a dynamic blog page using gatsby-plugin-mdx, in this part, we will do SEO optimization on the page using the React Helmet package.
- Build Blog Site using Gatsby JS — Part 1 (Getting Started)
- Build Blog Site using Gatsby JS — Part 2 (Chakra UI & Home Page)
- Build Blog Site using Gatsby JS — Part 3 (Gatsby Plugin Mdx)
- Build Blog Site using Gatsby JS — Part 4 (React Helmet and SEO tag)
- Build Blog Site using Gatsby JS — Part 5 (Deploy site to Netlify)
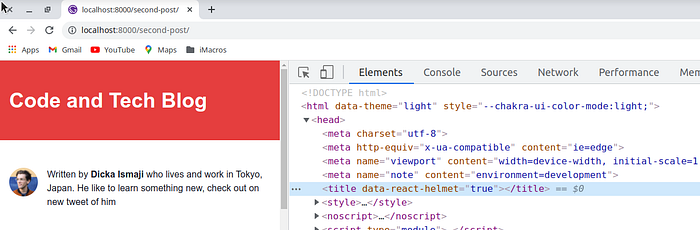
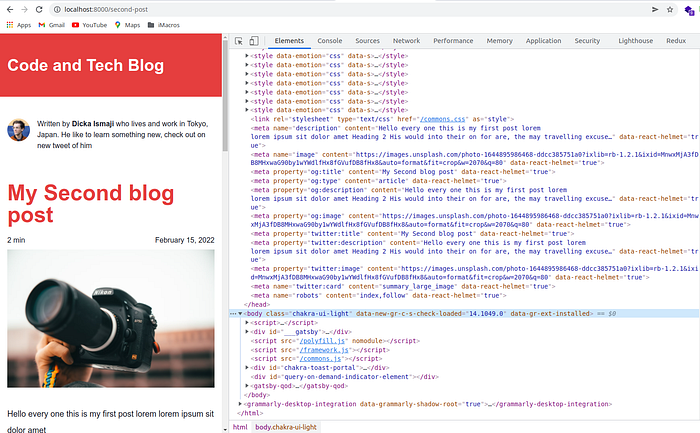
Previously if we look at the title tag on the page there is no specific title, it only shows the page URL, which is not good for SEO.
React Helmet is a reusable React component that will manage all of your changes to the document head.

React Helmet takes plain HTML tags and outputs plain HTML tags. It’s dead simple, and React beginner-friendly.
Example of React helmet code
import React from "react";
import { Helmet } from "react-helmet";
class Application extends React.Component {
render() {
return (
<div className="application">
<Helmet>
<meta charSet="utf-8" />
<title>My Title</title>
<link rel="canonical" href="http://mysite.com/example" />
</Helmet>
...
</div>
);
}
}
By using React Helmet we can easily add a meta tag to the head by inserting the helmet code into the gatsby js page component, during gatsby build time, the helmet will insert the syntax to the head tag, so it will be generated wit completely the head tag.
Create Seo Component
why do we separate React Helmet into React components, the main reason is reusable, instead of setup on each page.
/src/components/Seo.jsx
import React from "react";
import { Helmet } from "react-helmet";
export default function Seo({ title, description, image }) {
return (
<Helmet>
<title>{title || "Gatsby Blog"}</title>
<meta
name="description"
content={
description ||
"An blog that give information about technology and code"
}
/>
<meta name="image" content={image || ""} />
<meta property="og:title" content={title || ""} />
<meta property="og:type" content={"article"} />
<meta property="og:description" content={description || ""} />
<meta property="og:image" content={image} />
<meta property="twitter:title" content={title || ""} />
<meta property="twitter:description" content={description || ""} />
<meta property="twitter:image" content={image} />
<meta name="twitter:card" content="summary_large_image" />
<meta name="robots" content="index,follow" />
</Helmet>
);
}
Add SEO component to each page
/src/pages/index.jsx
...
import Seo from '../components/Seo';
export default function index({ data }) {
const { blogs } = data.allMdx;
return (
<Layout>
<Seo />
<Text fontWeight={'black'}>
Latest Article
</Text>
{blogs.map(blog =>
<Blog link={blog.slug} title={blog.frontmatter.title} date={blog.frontmatter.date} excerpt={blog.excerpt} />
)}
</Layout>
);
}
/src/pages/{mdx.slug}
...
import Seo from '../components/Seo';
export default function MarkdownPages({ data }) {
const { frontmatter, body, timeToRead, excerpt } = data.mdx;
return (
<Layout>
<Seo
title={frontmatter.title}
description={excerpt}
image={frontmatter.cover}
/>
...
</Layout>
);
}
export const pageQuery = graphql`
query($id: String!) {
mdx(id: { eq: $id }) {
excerpt
...
}
}
`;
add excerpt on GraphQL to add the description meta tag, and you can add a URL image to add cover images on
---
date: 2022-02-15
title: My Second blog post
cover: "your image url"
---
And then open your browser and look at inspect element that meta tag is appended on
Conclusion
Building a blog site with Gatbsy JS from scratch is takes a few steps, it's not taking too much time, it easy because you can read on their documentation site
You can visit the demo at https://gatsby-blog-starterr.netlify.app
Repository: https://github.com/dicka88/gatsby-blog-starter